Thursday, September 13, 2012

The Amazing Straw Bale Garden

“That’s amazing”! The words I most often hear when someone first walks through the gate. The interest in my straw bale gardening project began in earnest in mid-June when the vegetables reached a size that could be seen from the street. Countless visitors would start off with the phrase “I just had to stop by and find out what you are doing” and then they would repeat the comment “it’s amazing”.

I’ve been asked, “How did you do it?” by enough people to feel that it would be useful to chronicle my steps from the beginning in a single post with the benefit of the perspective that goes with having had the experience. Remember, I’m sharing what I did during my first experiment with straw bale gardening and what I learned along the way. This is by no means the best and only way to practice straw bale gardening. During my online research period, I discovered a variety of successful approaches and was forced to pick and choose ideas that seem to be aligned with my experience with gardening in the southwest high desert location.

First, I want to encourage those who want to try growing in straw bales to apply what you know about gardening in your area and your unique location. If you think you don’t know enough, ask those you think who would. During the course of setting up this project, I have been comparing notes with the local farmers at the farmer’s market, picking the brains of the knowledgeable staff at the local nurseries and listening to the old time gardeners who have knowledge about gardening in my area.

Since I was starting this garden on a property that was new to me, I took the time to make mental notes about the course of the sun and the wind, the temperature and precipitation during the seasons, and the possible interference of the observed wild animals before I broke ground. I have always had the best results with locations that receive the early morning sun and in turn get the first afternoon shade so I designated the location on the property (east), designed the orientation of the straw bales (east to west) and the placement of the plants (east shortest to tallest west) in the straw bales accordingly.
Rainbow Swiss Chard
Watermelon
Eggplant_2


Straw Bale plot - 5 Jan 2012
5 Jan 2012
The way straw bale gardening works is that the straw composts at a fairly quick rate and in doing so the composting straw provides the necessary nutrients for the plants concurrently as the plants reach maturity and begin to go into production. Even though the straw bales will start to compost without any human intervention, for the purpose of starting a new garden, it is practical to help the process get a jump start. Nitrogen is a key ingredient for composting materials. The most accessible, organic, and free source of water-soluble plant nutrients like nitrogen, phosphorus, and potassium is in the urea from human urine. Adding a healthy donor’s urea topped with compost (carbon) and keeping the straw bales moist for at least 10 days is the basic method to activate the straw bales to compost. I never found an exact formula for the amount of urine per bale. The first set of straw bales received a splashing that covered the top surface. The second set received a bit more measured amount, a half a gallon. After a few weeks, the strawberries in the second set of straw bales are already happily setting fruit.

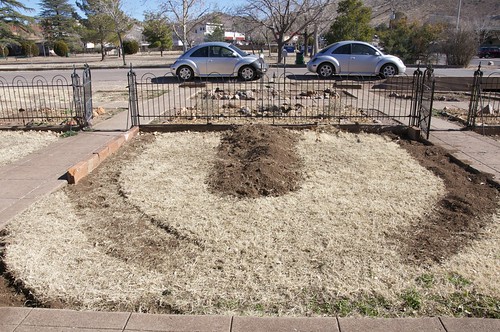
A YouTube video uploaded by an experienced straw bale gardener described how he starts conditioning the straw bales in the winter (he is in northern snow country). I kicked it into high gear to dig out the Bermuda grass so I could allow more time for the straw bales to start composting before the spring planting season began.


Straw Bales - 19 Jan 2012
19 Jan 2012
There is a whole lot of discussion online about straw verses hay. Hay was $18 dollars a bale compared to straw at $7.50 so I opted out on trying hay in my first experiment. Online, there is the general opinion that a lot of unwanted seeds will sprout from the hay bales while others reported that hay bales, by far, produce the healthiest plants and largest produce imaginable. What was passed on to me from a local resident about straw bales is that the time of year the straw material is harvested and baled has something to do with the amount of seeds contained within the bale. Another tip about straw bales that I found interesting is that corn and linseed (flax) bales are not recommended. I ran across a person who reported that nothing grew in his straw bales and when he gave up and used the straw throughout his garden it in turn damaged the plants there. It was suggested to him that his straw bales was barley. I doubled checked online and I found that barley bales were suggested for gardening. Maybe the problem was his straw bales were made of flax, which has an oily residue. It might be a crapshoot with our supplier because they never suggested that we have a choice. So far I haven’t had a problem but I did noticed that the straw bales purchased in July were made with a much rougher straw, lighter in color and had less seed sprouting from them then the straw bales purchased in January. I couldn’t tell the difference between a rye and an oat straw bale if my life depended on it.

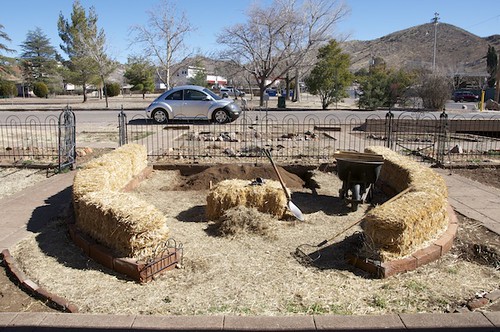
The orientation of the straw bales is another consideration. It is suggested to set the bales where the straw is oriented in a vertical direction. I experimented with the straw oriented in each direction and both directions gave the same final results. I noticed that the straw bales set with the straw in a vertical direction were easier to soak compared with the bales that were set with the straw in a horizontal direction. The water had the tendency to run off the sides of the bales set with the straw in a horizontal position rather than soaking in. That was when I was watering by hand. Once I installed the soaker hose system and the straw bales were well into composting mode, it really didn't make much of a difference.

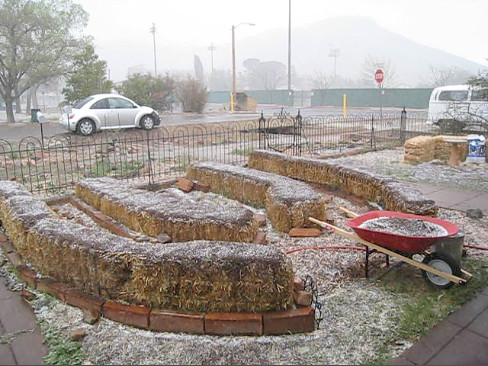
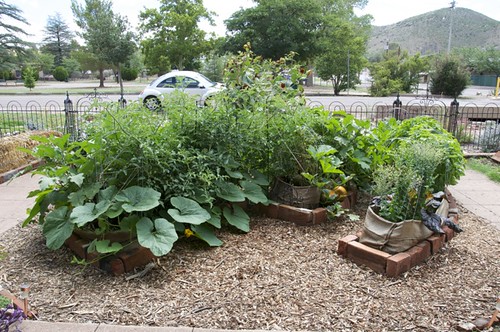
I set the straw bales roughly 3 inches into the dirt for stabilization. The bricks were placed more for decoration at this point but they still provided additional stabilization for the tall straw bales. Their main purpose is to hold the remaining composted straw bales at the end of the season. 


I tried an experiment with three straw bales in April, just before the 2 driest months of the year. I worried that it would be difficult to maintain enough moisture for the conditioning period this late in the season so I set them deeper (half way down) into the soil. That worked as well as setting them down 3 inches and they held enough moisture between the watering schedules to grow the plants. I noted that they composted down below the ground level within a couple of months. I added topsoil over them to bring up the soil level when it was necessary. 


I was not aware until recently that our neighborhood has a burrowing animal problem. The culprit has not been identified yet but I have noticed about a month ago that it has discovered my garden. The holes look suspiciously like a mole’s handiwork but my neighbors report a ground squirrel infestation. Laying down wire screen or fencing before you set your straw bales is recommended as a preventative measure.


Straw Bales - 19 Mar 2012
19 Mar 2012
I was fortunate that the east location on the property was the second best side of the house for wind protection. Still, I invested in metal hoops and frost protecting covers in preparation for the wind and any possible unexpected lows in temperature that the local old-timers reported to be possible in April and May. The warm weather in late March led me to believe that the coldest part of the winter season was over. I sowed the seeds and sprinkled the appropriate amount of amended soil that was recommended in the instructions for seed planting depth. I had lovely seedlings by mid=April.  

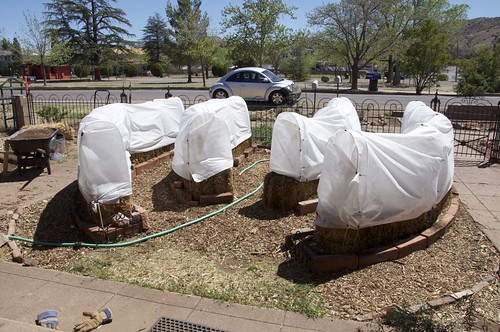
I realized quickly that hand watering the seedlings became not only a chore (unclipping the covers sometimes twice a day) but the pressure was also disturbing the seeds and soil. The water spray, even at the lightest setting was washing away the little bit of soil on top and exposing the seedling’s roots. Since I noticed seeds from the inside ring of straw bales were sprouting in the outer ring and seedlings growing between the bricks and bales, I could only imagine that the water pressure must have caused the seeds to bounce off one straw bale onto another and rooted. My tip for you is to set up your automatic watering system before or immediately after you sow your seeds. I used a small diameter soaker hose system and set the schedule for twice a day. The key to success is to never let the straw bales dry out. I also recommend buying an extra straw bale. I used loose straw to fill in the gaps between the bales and to spread around the base of the plants as needed.


Straw Bales Covered - 11 Apr 2012
11 Apr 2012
Another thing you will notice is mushrooms popping up all over the straw bales. This is a sign that your bales are composting nicely and providing fertile ground for your plants. At times I felt that they were getting out of hand, sprouting up at the base of my seedlings. The fact is I had more seedlings than I was going to keep so, in the end, it did not interfere with the final results of the project.

I had my first minor setback in early May. I made the mistake of uncovering the straw bales for some anticipated rain but we received a freak hailstorm instead. The young plants were battle worn but all of them fully recovered to my great surprise.


Straw Bales with Hail - 9 May 2012
9 May 2012
At the farmer’s market a local farmer expressed frustration with the evening temperatures averaging around 50F. I learned from him that the tomatoes and peppers prefer temperatures closer to 60F. The low temperatures may have explained why the growth rate came to a halt in May. Another explanation presented itself when I discovered that some of the straw bales were composting rapidly in the center as well as from the bottom like I had anticipated. When I dug a hole to place a tomato starter plant in the straw bale, I unexpectedly found a 6” deep empty cavern just below a couple of inches from the top. I imagined that the growth rate could be attributed to the plant roots receiving little nutrients beyond watering. I couldn’t find any discussion on this subject online. Out of desperation I first tried to fill in the caverns with dirt and straw from openings I made next to a plant. I was worried that this method was disturbing the roots too much. After noticing that the top of the straw bale would sink down if I put my weight on it, I decided to gently and as evenly as possible push the top of the straw bales down until I met resistance. This method worked best if I timed it just after watering.


Straw Bales with coffee Sacks
31 May 2012
In my opinion, growing plants from seed directly on the straw bales required more care and attention then placing young plants in the bales. At the end of the season both methods produced an abundance of produce so I can’t say one way is better than the other in that regard. Growing from seed provides more options for heirlooms and native varieties. Buying young plants from nurseries to get a jump start in the spring is convenient, especially when one doesn’t have a green house. But is it a sustainable system? I'll leave it there for a discussion in another post.


Straw Bales - 1 Jul 2012
1 Jul 2012
From seeds I planted the mustard, corn, swiss chard, basil, eggplant, sweet peppers, chili peppers, pumpkins, bush beans, a variety of lettuces and tomatoes. The bush beans withered once the heat of June arrived but just recently I discovered a young plant hidden under the basil. A couple of the sweet corn plants grew ears to a respectable size. Since I didn’t plant the corn in rows to promote wind pollination the product was inedible. I planted rainbow Swiss Chard, Pear and Better Boy tomatoes, yellow onions, Guajillo, Anaheim and Poblano peppers, desert king water melon, cilantro and parsley as young starter plants. All of them thrived in the straw bales. The cilantro immediately went to seed but new seedlings are sprouting back up from the straw bale.


To plant a starter in the bales, create a hole using a spade. Sometimes a pruner is necessary if the straw is tough and you need to transfer a plant from a quart size pot. I pushed the straw down using my fist until I felt resistance. I made a hole at least 1" larger in diameter and 2" deeper than the pot that the starter plant came in. I poured 2" of enriched soil in the hole, nestled the plant in, added the soil to fill in the extra space and spread the straw I removed from the hole over the base. I used the soil from my garden mixed with organic compost. As a side note, I discovered later that this is not recommended as you run the risk of adding harmful viruses or plant-parasite nematodes from your garden’s soil. I didn’t have any problems that I’m aware of so use your best judgment.


Straw Bales - 29 Jul 2012
29 Jul 2012
I learned from the experience of one person in the area who had tried straw bale gardening before me that the straw bales need some type of support as they break down or they are likely to tip over with your plants. My solution was to tie used coffee sacks made of jute fibers together and secure them to the metal hoops that were used for the covers. The sacks contained the straw bales as needed and are composing along with the straw bales now that they are at a safe height. I noticed that the coffee sacks served more than its intended purpose in suppressing the sprouting grass and mushrooms on the sides of the straw bales and slowed the rate of evaporation.


August Rain Shower - 3 Aug 2012
3 Aug 2012
Some gardeners report that they are able to use the straw bales for two years. By August, my straw bales composted down to 6 inches from the original height of 21 inches. I plan on using them for the winter crop but I think I may have to start with new straw bales for planting next spring.
 
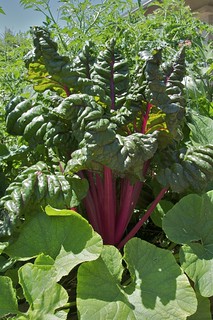
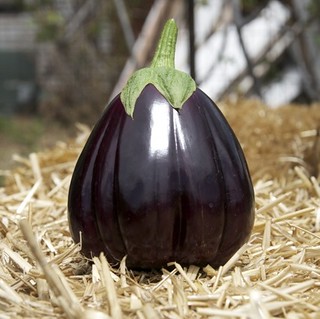
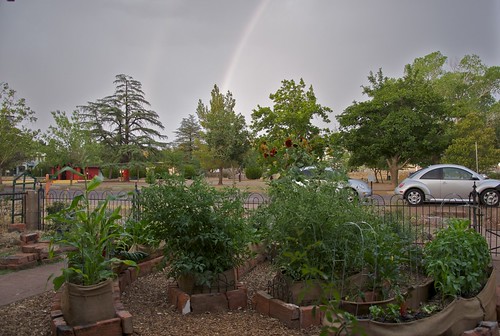
The challenges with nurturing the kitchen garden had more to do with the factors any gardener would face and were unrelated to the straw bale gardening method. The straw bales provided the necessary nutrients and then some. Although a variety of garden pests arrived; vine borers, squash bugs, flea beetles, locusts, hornworms and leaf-footed bugs, the plants held up against the onslaught remarkably well. I attribute this to the fact that the plants were strong and healthy, living in the rich environment that the composting straw bales provided. The swiss chard reached science fiction proportions.
 
I feel a sense of validation when several visitors expressed the desire to try straw bale gardening after seeing my results. In fact, my partner was told, "You must have started something", from the feed store employee who remembered us buying straw bales for gardening earlier in the year because they were currently sold out of straw bales with the demand coming from other gardeners in the area.


Straw Bales - 11 Sep 2012
11 Sep 2012
From my perspective, what is amazing is the excitement generated from my little straw bale garden experiment. Although there is no denying that I did put a lot of physical and mental energy into setting up this project, the rewards for my effort go beyond measure. Something as basic as a front yard kitchen garden provided me with the opportunity to share my ideas, to share my food and to share my love for this planet. In return my community has given me a definitive thumbs up. I haven’t felt this much joy in a long time.

Links for the straw bale gardener:

No Dig Vegetable Garden 

Straw Bale Gardening: Start to Finish (YouTube Video)

Daves Garden: Strawbale Gardening Forum (subscriber membership fee)